Building a Compass That Finds Pizza
Released on 04/28/2021
This is a compass.
It's just like any other compass.
It's got orienting lines,
a ruler,
a rotating bezel
and a magnetized needle.
But do you know what the most frustrating thing is
about a compass?
It only points North.
But what if there was a compass
that could point to something way cooler?
Like, I don't know, the nearest slice of pizza.
So that's my challenge.
WIRED has given me three weeks
to figure out how to turn a regular compass
into a compass that points to pizza.
[upbeat music]
That's beautiful if I say so myself.
Oh, this is so cool.
[chuckles] It's actually working.
To the pizza.
By the way, I'm Joe Grand.
I'm a computer engineer, hardware hacker,
and former technological juvenile delinquent.
I built my first circuit board when I was 10 years old
and I just love doing this stuff.
Successful.
So there's a few goals for this project.
The most important one
is to actually build a system
that no matter where I am in the world,
it's gonna point me to the nearest pizza place.
The second goal is to take our mess of wires and components
and refine that into something much smaller,
more like an actual compass
that we can just walk around and use.
The third goal is to make this thing as simple as possible.
So you just push a button and you follow the LEDs.
There's two separate design aspects for this project,
the hardware and the software.
[upbeat music]
The core of the project
is this little module made by Particle.
It's a microcontroller module
and a cellular network interface module in one.
This is gonna control all the other peripherals
in our design,
and also let us communicate to the internet
over the cellular phones network
to get the information that we need
to point us in the right direction.
We have our antenna.
The next piece is our GPS module.
GPS is pretty common these days,
it exists in all sorts of different devices
like in your cell phones,
which is probably how you're being tracked right now.
The next thing is a magnetometer.
This is a digital compass.
So it's gonna measure the magnetic field of the earth
and tell me my heading.
Next, we have our LED indicators.
Of course, no electronic product would be complete
without a way to power it,
so we have a small lithium ion battery.
Oh, I didn't put a button,
but whatever.
Maybe I should get a button.
How can I forget about the button?
Do I want laser, missile or top secret?
I'm gonna go with top secret.
[upbeat music]
So this board here is called a breadboard.
It's basically a little board
where you can plug components into it.
So it just makes it really easy
that when you're prototyping,
you can take parts in and out as you need to
to kind of get stuff working.
[upbeat music]
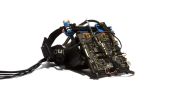
I have these individual components
all plugged into the breadboard and wired up,
at least in an initial configuration.
I'm not exactly sure how things are gonna go
once I start writing the code,
but this at least is gonna let me get started.
Now, I'm gonna go take it over to my other desk
and start working on the code,
but first hold on,
I gotta hack into the Gibson, [keyboard clicking]
move the satellites around and you're done.
[laughs] [bouncy music]
So my plan now is to work on the code
and try to get each of the individual components operating.
So I basically have some sample code that I'm using
from the open source community.
So code that other people have written
to support different modules.
Taking that, kind of modifying it,
tweaking it for what I need
and just making sure that I can communicate with each thing
at a low level.
Error.
That's usually not good.
[keyboard clicking]
[sighs] All right, we finally have some progress.
LEDs turn on,
let go of the button,
LEDs turn off.
So I have the LED ring working.
I have the button working,
now I need to get the compass working and the GPS working,
and then the cellular connectivity working
so I can communicate to the internet
over my microcontroller.
I am still working on some code
to get the compass module working.
I have a little debug terminal over here too.
So I can send messages from my microcontroller
to the screen so I can actually see like,
what state of the system are we in.
So right now it's just waiting for a button press.
So when I go and hit the button press,
the system should start doing some setup.
All right, welcome to pizza compass.
The LEDs turned blue
just so we know that we're in a different state.
When I let go of the button, the calibration will stop.
Let go of that.
And now we can see X, Y and Z values and microtesla.
These are basically just readings from the sensor
of the magnetic field that it's reading.
So if we actually spin the unit around,
we can see those values change.
Now, those values don't really mean much to us right now,
but what we're gonna do is,
along with our calibration values,
calculate the actual heading of this compass,
you know, which direction is this compass facing.
Taking boring numbers like that
and turning it into something useful,
and then we're gonna try to display that as an LED
on this ring.
Code.
[intense rock music]
So just taking some baby steps here,
by adding some code to take the compass information
and convert it from the magnetic sensor data
into an actual compass heading,
and we can see down in our little terminal window over here,
that right now it's about 50 degrees.
If I rotate my board in a circle,
that's gonna change the heading.
[intense rock music]
I wish this was more exciting.
Reminds me of the story when [chuckles]...
Well, I won't tell you that one.
So this is pretty cool.
I now took the heading that we were getting,
basically divided it by a 360 degree circle
to figure out which of the 24 LEDs on our ring
should be lit up.
As I rotate this board,
the LEDs stays in the same position.
So it's maintaining its heading
no matter which way we're pointing,
sort of like an actual compass.
Compass code complete.
Onto the GPS.
[upbeat music]
I know that the hardware already communicates properly
to this Particle cloud service,
but what I haven't figured out yet
is how I can send a query
with our GPS coordinates over the network
to get the information back about the nearest pizza place.
Here's what I'm thinking.
I'm gonna push a button on the compass.
That's gonna send my local coordinates
over the cellular network to Particle.
Particle is gonna take that,
send it as a search query to Google with my coordinates
and asking for the nearest pizza place.
Google is gonna respond with that information,
send that back to me.
I'm gonna process it,
and that's gonna point us to pizza, hopefully,
cause I'm hungry.
It's kind of funny
cause being a kind of paranoid old school hacker,
I tend to avoid Google services as much as I can,
but in this case,
Google just ended up having the best results that we need.
You know, they offer their API
to basically let developers and let engineers,
and let people use their technology
and use their search engines
without having to physically type stuff in.
They're kind of just contributing to this general
collection of internet of things
and this general collection of cloud-based
intelligent computing.
So it's the Google maps platform text search.
It's a certain service you can sign up for with Google,
so I just logged into Google,
signed up for the API.
All you basically are doing is passing in a query.
I put pizza.
Of course, you could change that to anything else you want
cause it's Google.
And then the locations.
So you'll pass in the GPS coordinates
that, of course, we've captured with our GPS module,
and then the key,
which is your own private API key
that ties this request to your particular account.
So of course, pretty much all of this
is gonna have to be blurred out.
[smooth jazz music]
But if I go and paste this into a web browser,
it's gonna go to Google query from Google
and get back in a JSON format,
all of the search results.
So this is basically given my locations.
Searching for pizza, what's around me?
A lot of information is transferred behind the scenes
that we never see over the internet.
It is in formats like this,
which is kind of cool.
Latitude and longitude,
that's what we're gonna end up grabbing
from this entire blob of information.
That's what we wanna use.
So let's go ahead and press the button.
If we look on our screen,
we can actually see sending request.
So we are formulating a packet
that we need to send over to the Particle cloud
and then Particle sends it to Google.
So it's sending with our coordinates,
along with some of the other information that it needs.
There's a whole kind of packet structure
that we have to send over to Google.
We already see data received.
So it went over the network to Particle, to Google,
back to Particle, back to us.
We can see here GPS coordinates,
and then the name of the pizza place,
which is Sunny's Pizza.
That's one of the few pizza places that are around my house.
Now that we have that,
we can continue to take those coordinates,
feed it into the algorithm
that has to figure out the point to point locations
and direction and all of that.
But the fact that we can send data
and formulate the packet that we need
and then get information back is pretty awesome.
I'm super excited about that.
[upbeat music]
A circuit board is really
a physical manifestation of an electronic product.
It physically holds the components onto the board,
but then it also provides the electrical connectivity
between all of the components.
[upbeat music]
Designing circuit boards is really like creating art,
and it actually is called artwork
when you create the circuit boards,
that's the technical term, is the circuit board artwork.
Most of the time though,
circuit boards are inside of products,
they're not seen.
So they're really designed and manufactured
to fit into an enclosure,
to be easily tested,
to make it easy to assemble.
They're not really worried about aesthetics
and how it looks,
but that's something where
a lot of the stuff that I work on,
I don't put it in a housing.
I have the circuitry exposed.
I want it to look not really like a circuit,
but more of a piece of the larger project.
So I don't want it to just look like a piece of electronics.
I spend a lot of time in the circuit board design tool,
which is not intended to work really with graphics at all
to try to make products that look cool,
and it takes a lot of time,
it takes a lot of tweaking and trial and error
to bring in graphics and adjust them
and kind of fit well
with the actual required electrical connections,
but that's really, to me,
is what's so satisfying about creating a board,
is you put in all this effort
into essentially a piece of art
and you can express yourself in different ways
through that medium and get something back.
So it's a very kind of special sacred process
to work on circuit boards.
So here's a rendering from the circuit board design tool.
This is the front side of the board.
I had added the artwork,
so now we have all these artistic elements.
We want it to look more like a compass.
So we have the ruler,
we have our compass rows down here.
This is all gonna show up as immersion gold.
So this is gonna be gold-plated.
The GPS is gonna go here,
the button's gonna go here,
the LEDs will go here,
the magnetometer right there in the middle,
and then the backside will have the other circuitry.
I thought that looks pretty close to an actual compass,
especially with the ruler on here and everything.
I'm super excited.
As far as production and manufacturing of circuit boards,
there are hundreds of manufacturing facilities
around the world that will manufacture your circuit boards.
You basically provide them with a bunch of design files
called Gerber plots,
which is kind of a text representation
of your entire circuit board design.
So I'm gonna have
a professionally manufactured circuit board
and then have it professionally assembled as well.
I might need to do some touch up hand soldering,
but if everything goes well,
it's gonna be manufactured and assembled by machine
and then sent back to me.
[upbeat music]
The first step is the raw material selection.
Then it's time for drilling.
The drilled panels are coated with a resist.
Those panels are then taken to a laser plotter,
which burns an image into the resist film.
Then those panels are placed into a special rinse
that removes all of the laser burn portions,
leaving only the design that I specified.
For electroplating,
the boards are put into special pulse plating tanks.
The exposed copper and the drilled vias
are gonna be plated,
which gives us the copper connections.
The next step is to etch off the copper
that was previously protected by the resist film.
That leaves only the copper traces
on the top and bottom layers that I've designed.
The solder mask is the black coating
that I've specified on my board.
They place the circuit board panels onto a screen printer,
similar to how a T-shirt is made.
The assembly process is a little less complicated,
but there's still a number of steps.
[upbeat music]
Once the solder paste is applied,
the boards then go to the pick and place machine.
The pick and place machine takes all of the parts
and places them exactly where they need to go
on the circuit board.
They then go into a reflow oven.
It's sort of like a giant cookie machine.
The boards go in,
follows a very specific heating profile
and it comes out at the end a freshly baked circuit board.
After the boards passed the 3D x-ray,
they go to AOI, automated optical inspection.
This time the operator is looking at all the components,
making sure they are soldered down properly,
nothing sticking up,
just to get that final last step
before the boards are cleaned and sent on their way.
For our board,
we need to go through an additional assembly step
because the GPS module can't go through the wash,
so it has to be hand soldered.
There's a pretty clear difference
between the parts that I use for the prototype
and the parts that I use
for an actual production circuit board build.
The main difference there
is for the prototype I was using little modules,
sort of development boards
that are intended to make it easy
to connect it to a prototyping board like we did,
run wires to it,
test all the different features,
but I don't need all of this stuff around it.
What I'm using for the production build
is just the actual component itself.
There are some additional components I need for it,
but I don't need that giant board
with all the pins and everything.
So basically moving from modules
that are designed for development
into using the individual components
intended to be mounted directly onto a circuit board.
[upbeat music]
I heard a knock on the door.
The package is here.
[upbeat music]
This is it right here.
And spare components in the bottom.
Oh, I am nervous.
So many layers,
it's like peeling an onion.
So far so good.
Holy moly.
Oh, it looks so cool. [laughs]
So the compass in the middle,
the LEDs along the side,
our button to start our quest
and send the data over the internet,
our GPS module,
our ruler in case we need to measure things.
Here is the connector for the Particle board,
some of the discrete components,
and all the traces are on the backside.
Assembled pizza compass board is done.
We have three of them
just in case something goes wrong with one or two,
but it looks amazing.
I can't believe how fast we got these things back.
We're good to go.
Fingers crossed,
ready to give this a try.
[upbeat music]
It's been three weeks since I started the design,
and today is the final test.
Let's go find some pizza.
Let's power this thing up.
Plugging it in.
Right, so first thing we're gonna see
is the LED's initializing
so we can make sure they work.
Now, we're waiting for the connection
to the Particle network.
The green is looking for a GPS fix.
So now we're in the next state,
which is that the compass is ready for calibration.
I'm gonna hold the button down
and all the lights will turn on.
So now we're in the calibration mode
where we need to rotate the board
in all of the different axes
in order for the magnetometer to read
all of the different values.
So we do it in the X, in the Y, in the Z.
So we push the button to exit calibration.
Now we're in our rainbow color wheel.
This is just waiting for us to push the button
to start our quest over to the pizza place.
Sending the coordinates.
Waiting for a response.
And now pointing the pizza.
So let's see where this takes us.
[suspenseful music]
So I think I have to go that way.
I just reached my first intersection
and the compass is pointing as the crow flies.
So unless I wanna walk through a whole bunch of backyards,
I need to follow the roads.
So it looks like I need to go right down here.
[suspenseful music continues]
I can tell we're getting close
because the compass is starting to veer off of the straight
and point more towards the left.
So I think this next block up here, I'm gonna turn left.
Oh, this is so cool. [chuckles]
It's actually working.
Let's turn left.
Now we see green light pointing straight ahead.
We made it to the pizza place.
The compass works.
Let's eat.
Ah, thank you.
Pizza.
I've been waiting three weeks for this pizza.
Oh, look at that.
So there you go.
That's the pizza compass.
Yes, it's a little bit cheesy.
Yes, there's other ways to reach the same conclusion,
but that's the beauty of engineering.
Taking something that's in your head
and turning it into reality.
My real reason for doing projects like this
is to put them out in the world
and see what people do with them.
The project is fully open source,
so you can look at the hardware design,
you can modify the code to do whatever you want.
This is just my interpretation
of what a pizza companies can do.
You can refine it to do whatever you want.
Maybe change the LEDs for different animations,
change the battery consumption and make it last longer,
or even have it point somewhere different.
The point is you can learn from it
and do whatever you want with it.
This project wouldn't have been possible so quickly
without the contributions of the open source community.
People who designed the software libraries,
people who worked on the hardware modules.
If I had to do all of that from scratch,
it would have taken me a few months of effort, if not more.
Let me know what you think about the project
in the comments below.
What would you point it to?

Bar Owner Builds an Alarm That Stops You From Forgetting Your Credit Card

Building a Compass That Finds Pizza

Video Game Microwave That Only Cooks While I Play

The Surface Book Really Is the Ultimate Laptop

Gear Review | Apple ipads Pro

Gear Review | WIRED's Creative Team Tests Apple's ipads Pro and Pencil
Coravin's Wine Gadget Lets You Drink One Glass Now, Save the Rest
How Oculus Cracked the Impossible Design of VR

The Untold Story of Magic Leap, the World's Most Secretive Startup

AR, VR, MR: Making Sense of Magic Leap and the Future of Reality